Image Optimization for Photographers: Compress Without Losing Detail
A practical guide to image optimization for photographers: compress photos on Mac for client galleries, portfolios, and the web without trashing detail.
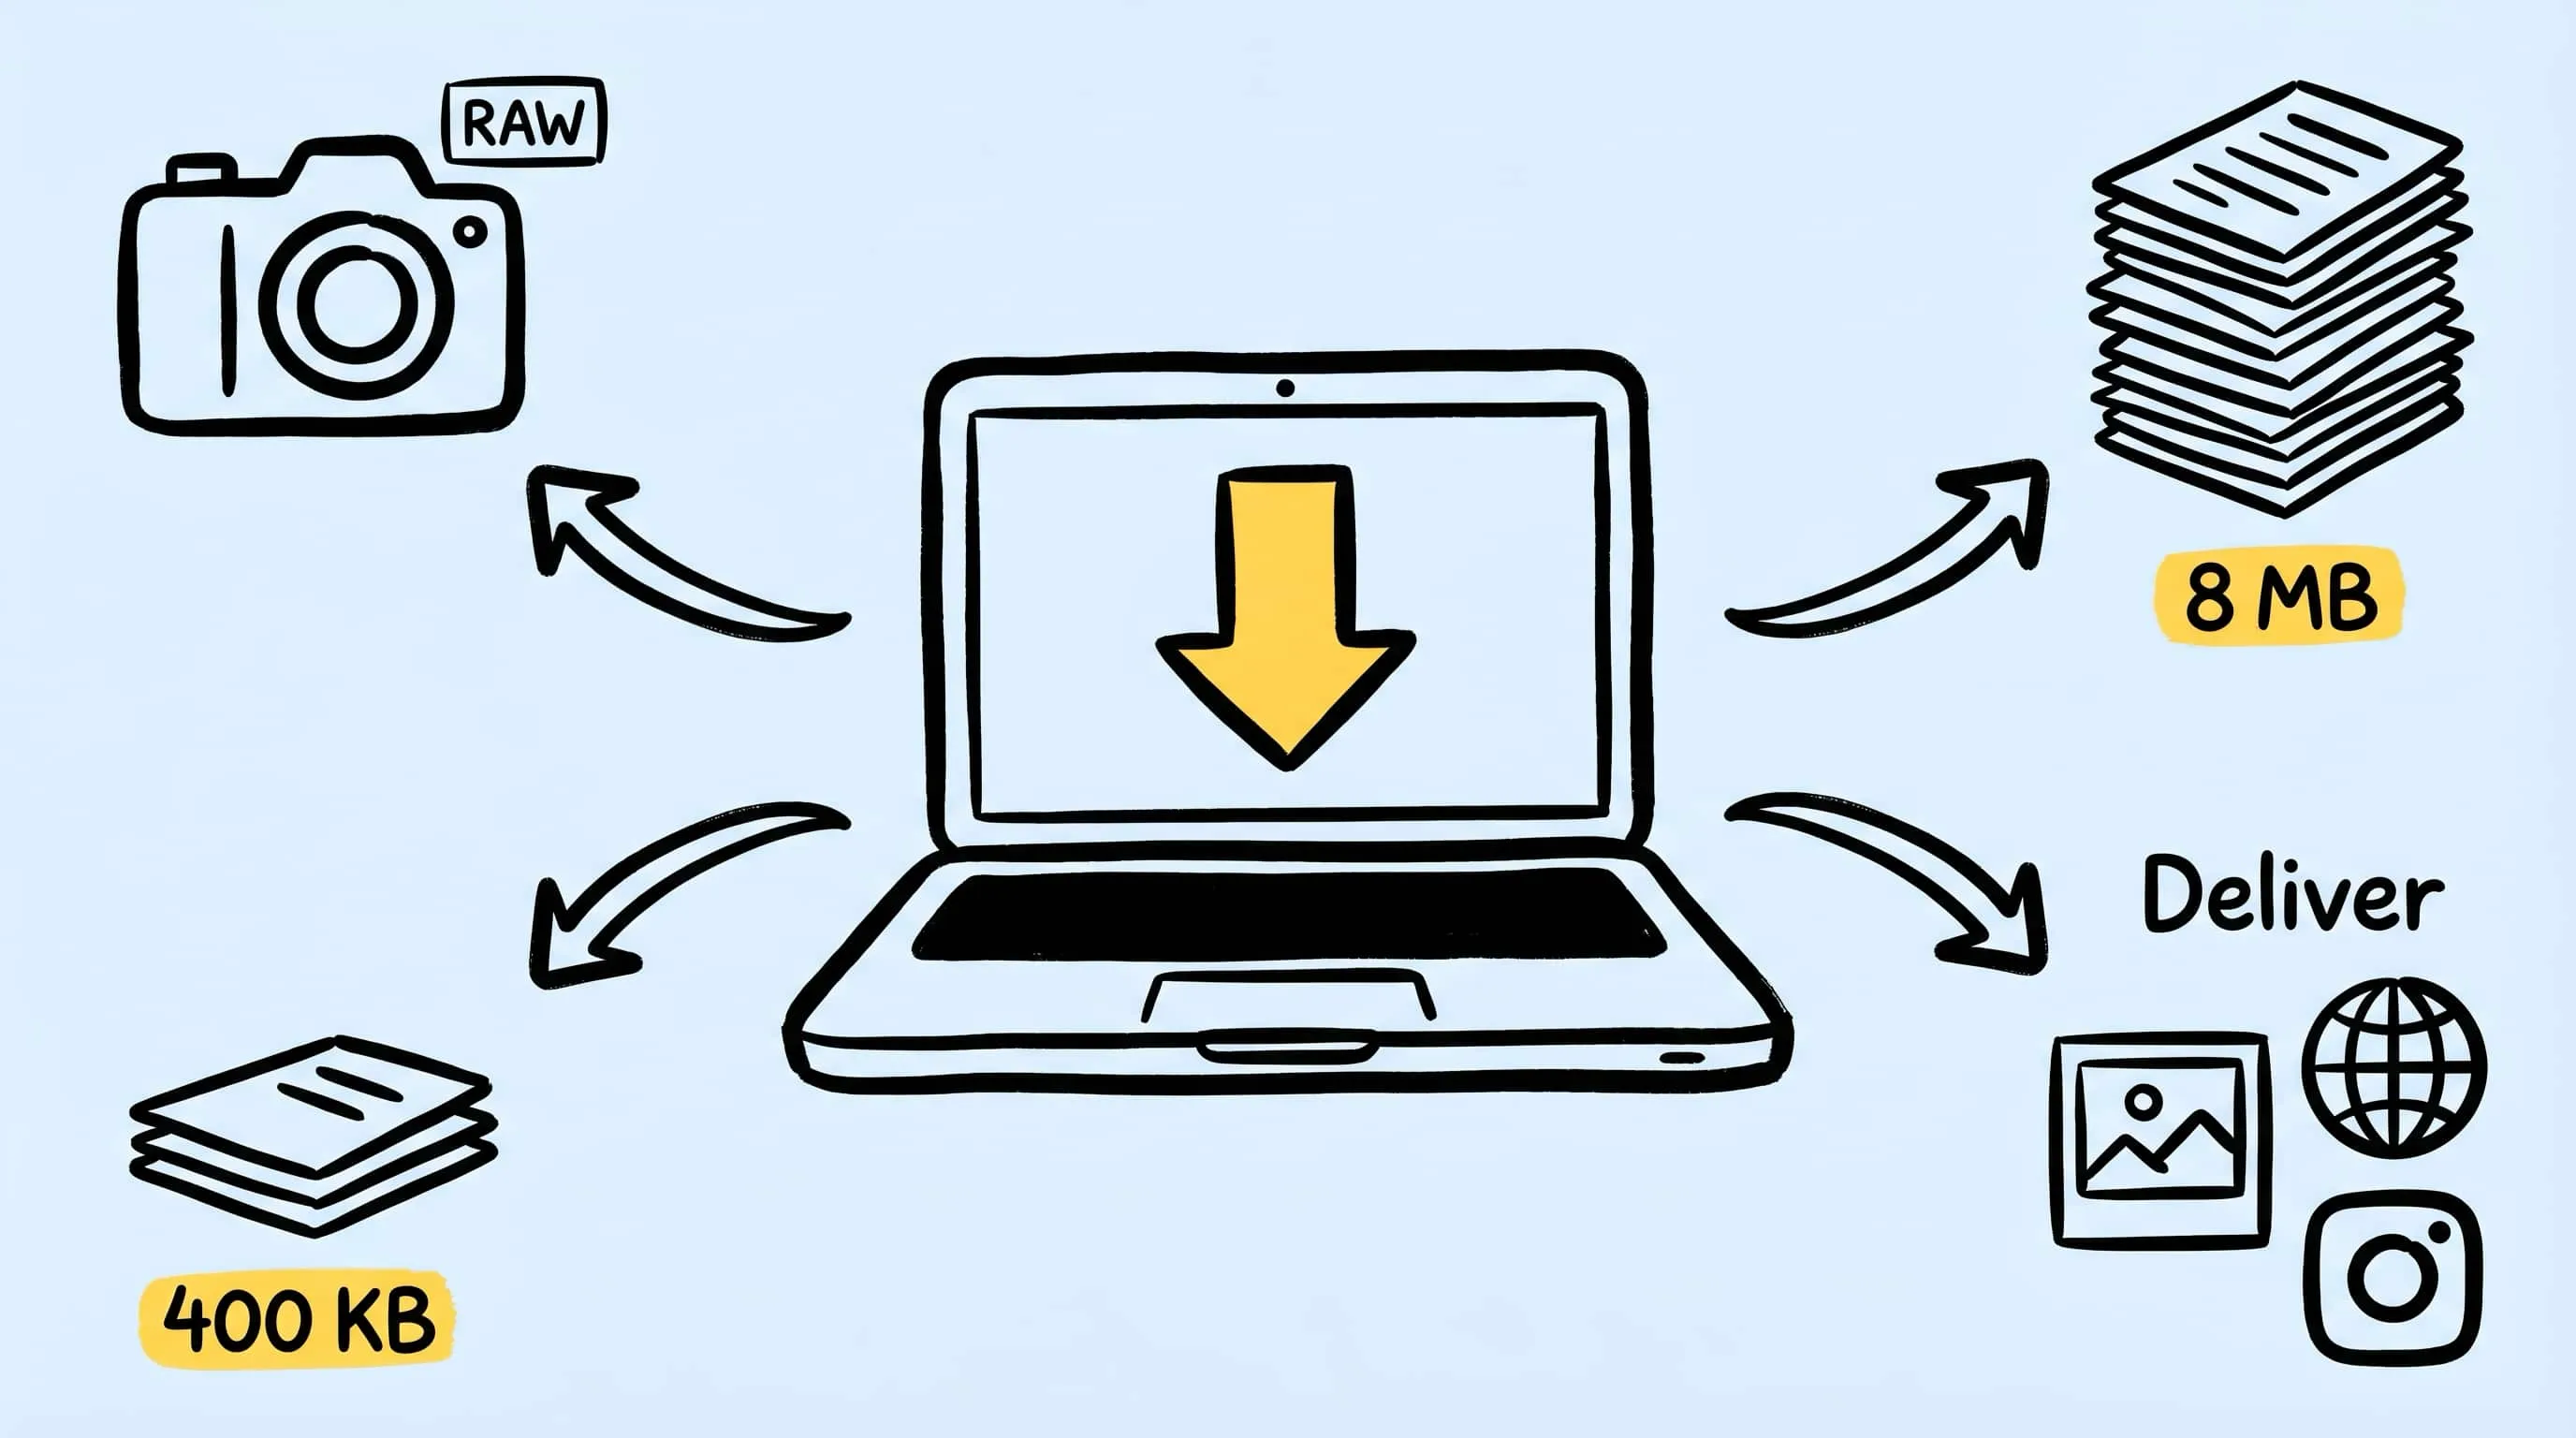
If you shoot anything more serious than a phone snap, you already know the uncomfortable truth about image optimization for photographers: the file that looks perfect in Lightroom or Capture One is almost never the file that should go to a client gallery, a portfolio site, or an Instagram grid. Full-size exports are too heavy, CDNs hate them, clients complain about slow loads, and every JPEG export eats a little bit more quality.
This guide is about how to compress photos on Mac in a way that fits a real photography workflow: small enough to ship, clean enough that nobody notices it got optimized, and fast enough that you actually do it every time instead of only when you remember to.
Why Photographers Need Compression (Not Just Resizing)
A lot of photographers solve “big files” by only resizing. Export at 2048 px wide and call it a day. That works up to a point, but it leaves a lot on the table.
Resizing reduces the pixel grid. Compression reduces the bytes per pixel. The first one is about dimensions; the second one is about how efficiently the file stores what is already there. You usually want both.
A 2048 px JPEG straight out of Lightroom can easily weigh 1.2–2.5 MB. The same image, visually indistinguishable, can land comfortably under 500 KB with a sensible compression pass. That is 60–75% less data, without touching the part your eyes actually care about.
For a portfolio site, the gap between “beautiful images, slow site” and “beautiful images, snappy site” almost never comes from the camera — it comes from whether the images were compressed properly before upload. Google’s Core Web Vitals (LCP in particular) are very blunt about this.
If you want background on the tradeoffs, read What Is Image Compression? first.
Lossy vs Lossless: What Photographers Should Actually Pick
Every photographer runs into this argument eventually, usually framed as “lossy is bad, keep everything lossless.” That is not quite right.
- Lossless compression keeps every pixel exactly as it was. Great for archives, masters, and anything you plan to edit again.
- Lossy compression throws away information that human eyes barely perceive. Much smaller files. Perfect for delivery.
For photography delivery — client galleries, web portfolios, social posts, blog articles — lossy is the right choice almost every time. The goal is not “preserve every bit”; the goal is “look indistinguishable at the size it will actually be viewed.”
The rule of thumb:
- Keep a lossless master (RAW, or TIFF, or high-quality JPEG/HEIC export)
- Create lossy copies for every delivery format
Never, ever deliver from the master and recompress it repeatedly. That is how photos quietly degrade over months.
For a deeper breakdown, read Lossy vs Lossless Compression: Which One Should You Use?.
How to Compress Photos on Mac With Zipic
Zipic is built around a single idea: configure a preset once, drag files in, done. There is no “Start” button, no multi-step wizard. Your workflow shrinks to “drop and get back to editing.”
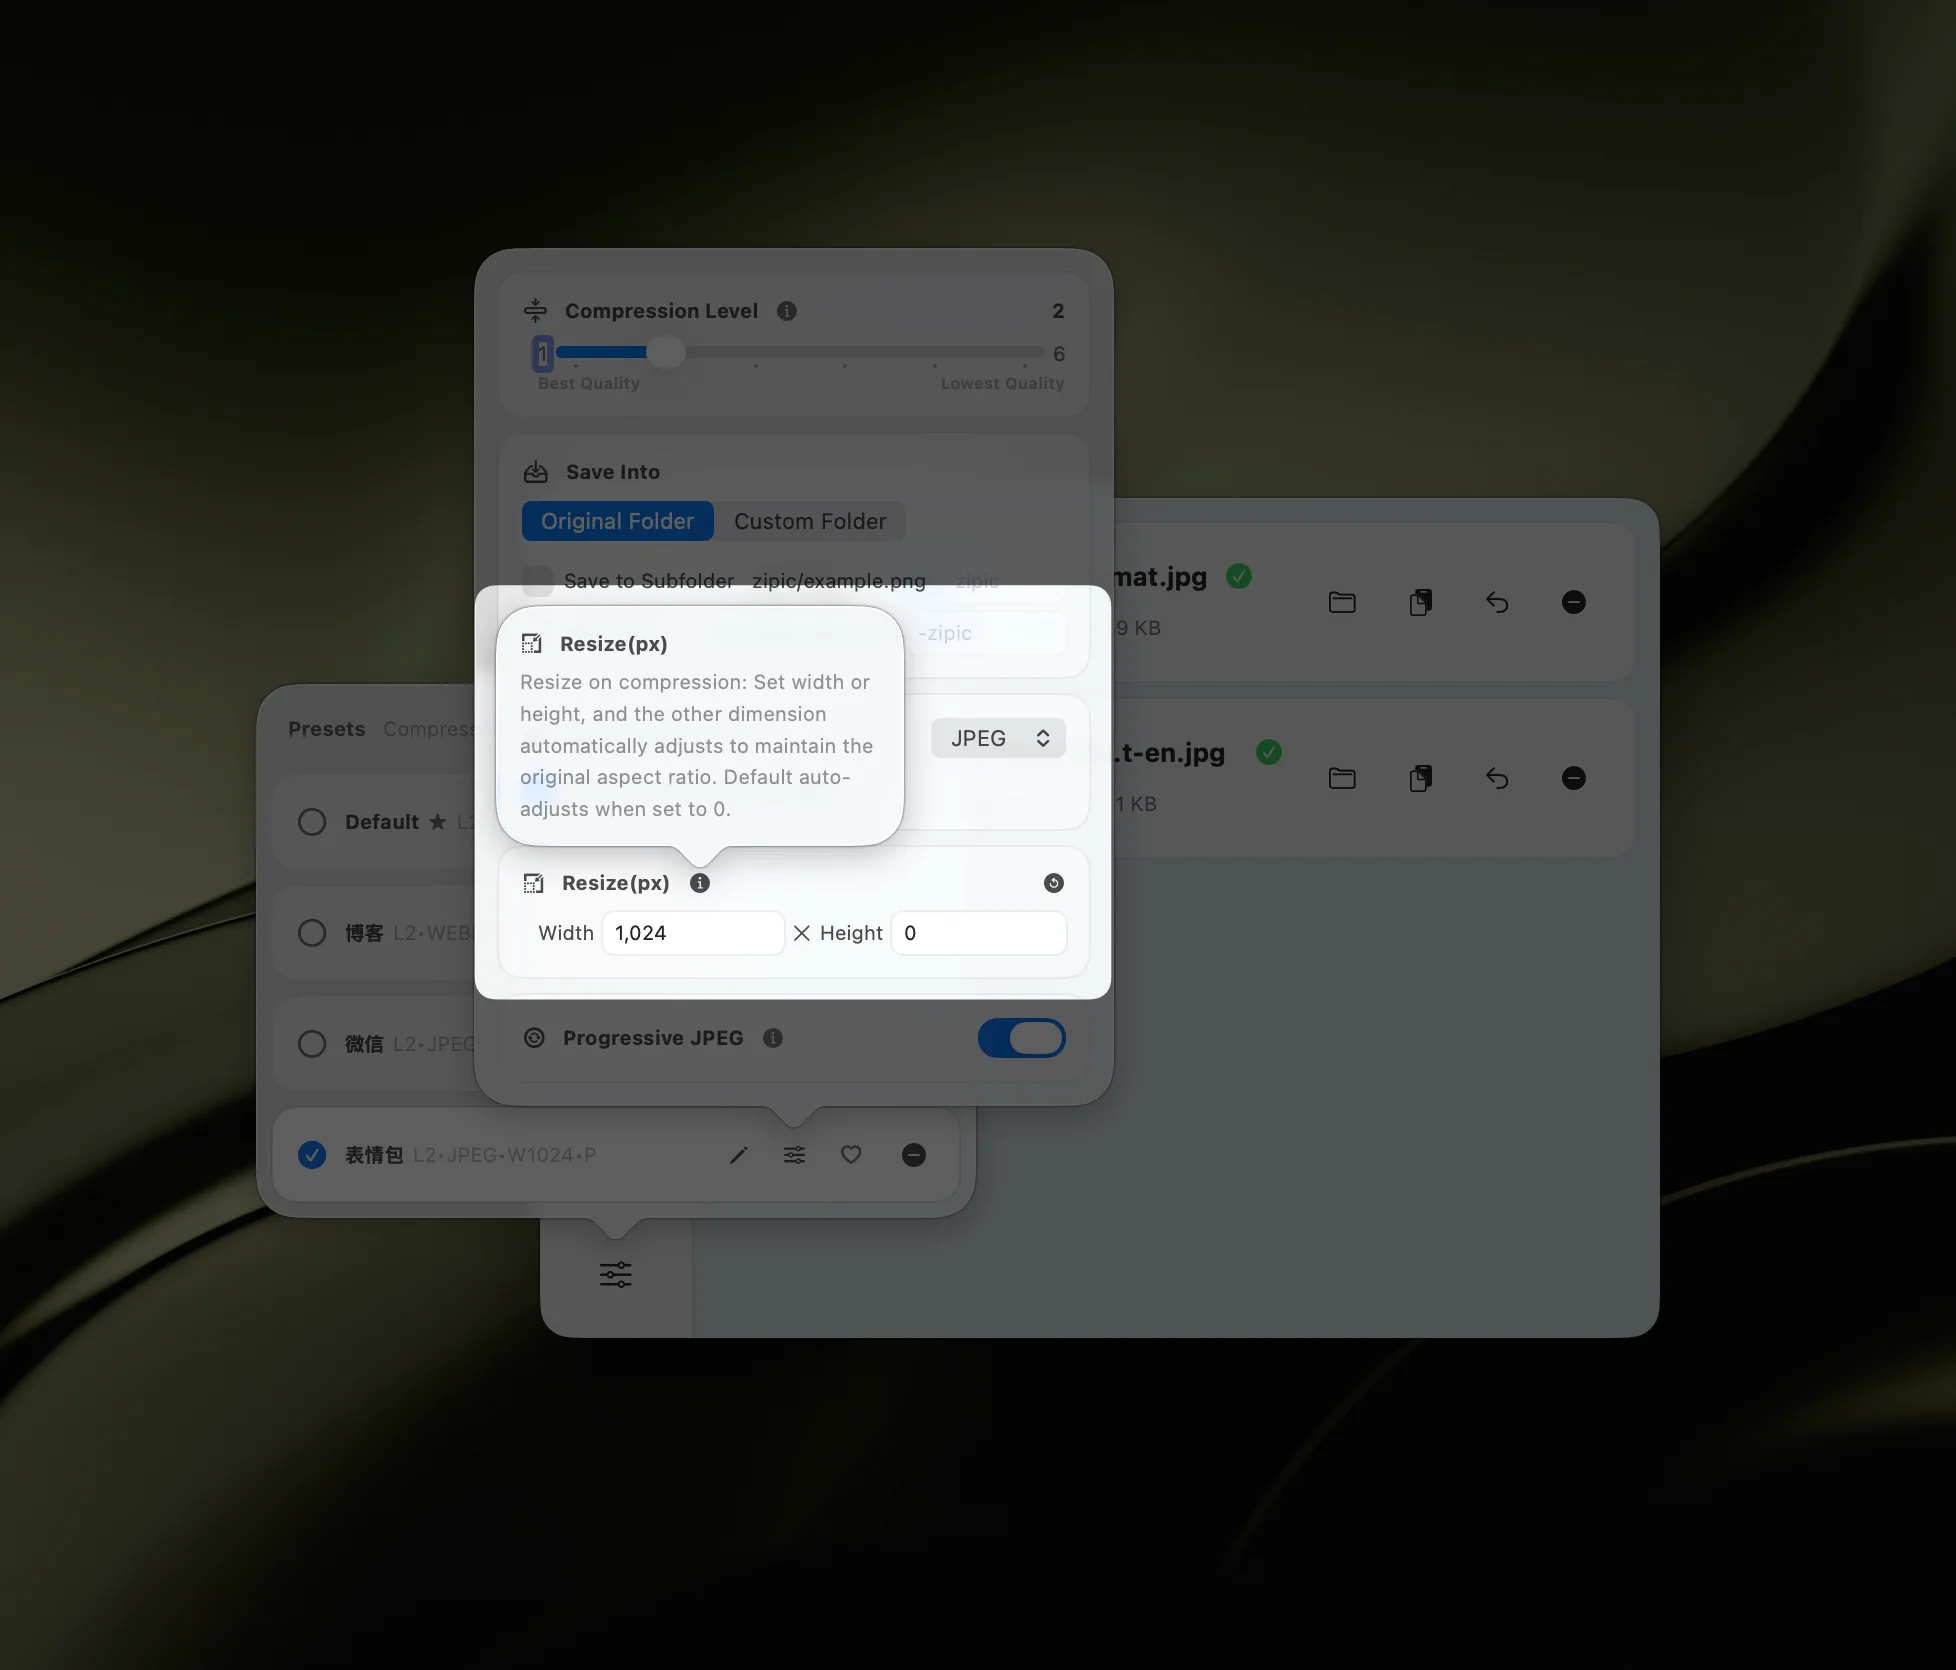
Step 1: Open the Preset Editor
Open the main window, click the Compression Settings button at the bottom left, and either pick an existing preset or create a new one tuned for photography.
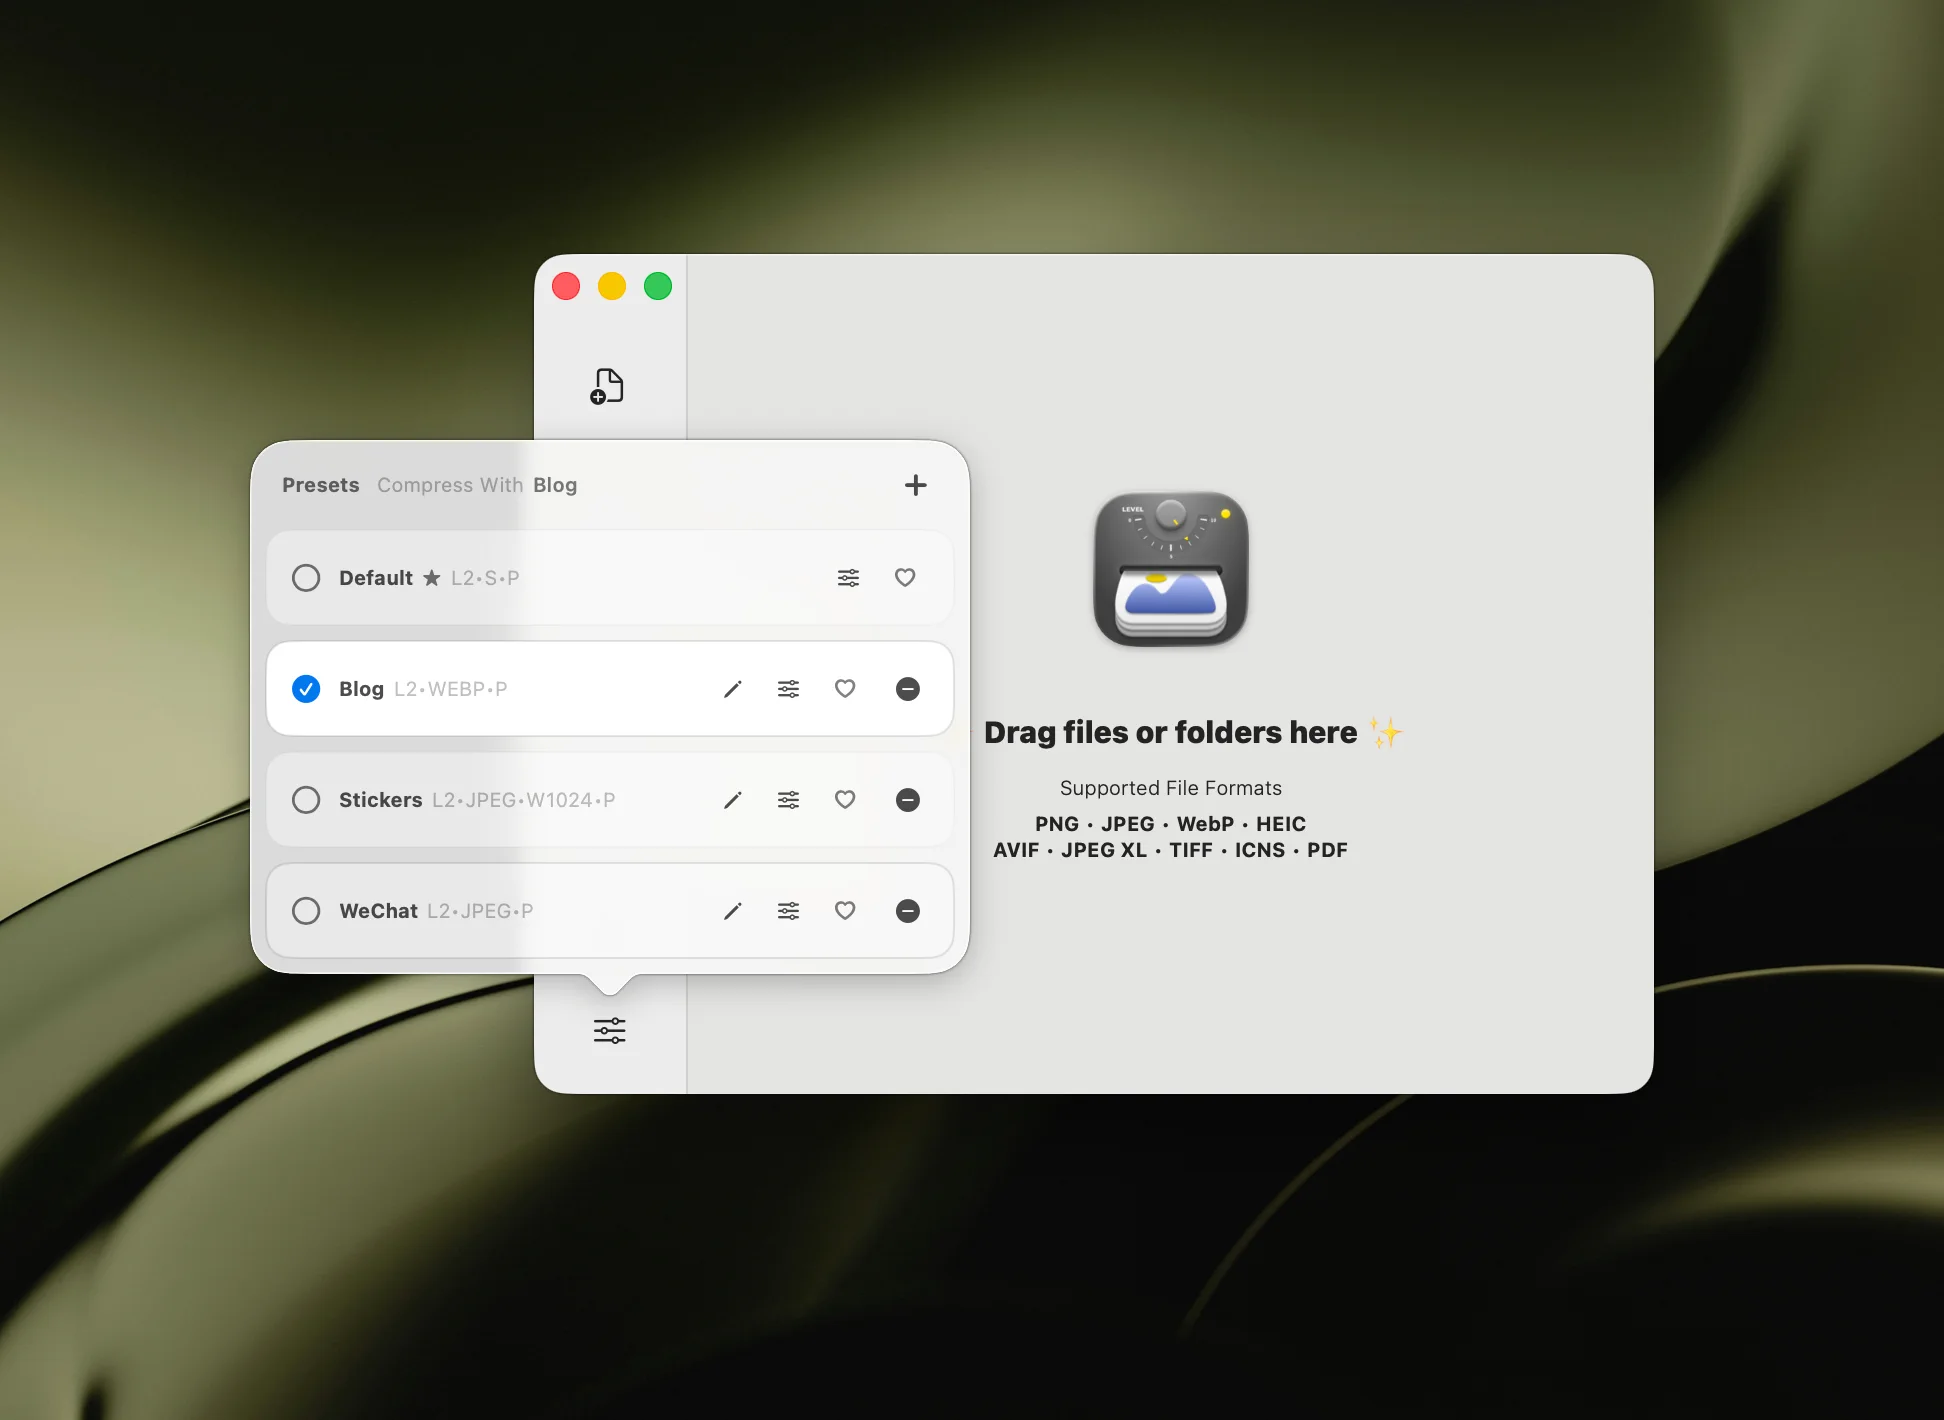
Step 2: Configure a Photography Preset
Inside the preset editor, set the four things that matter:
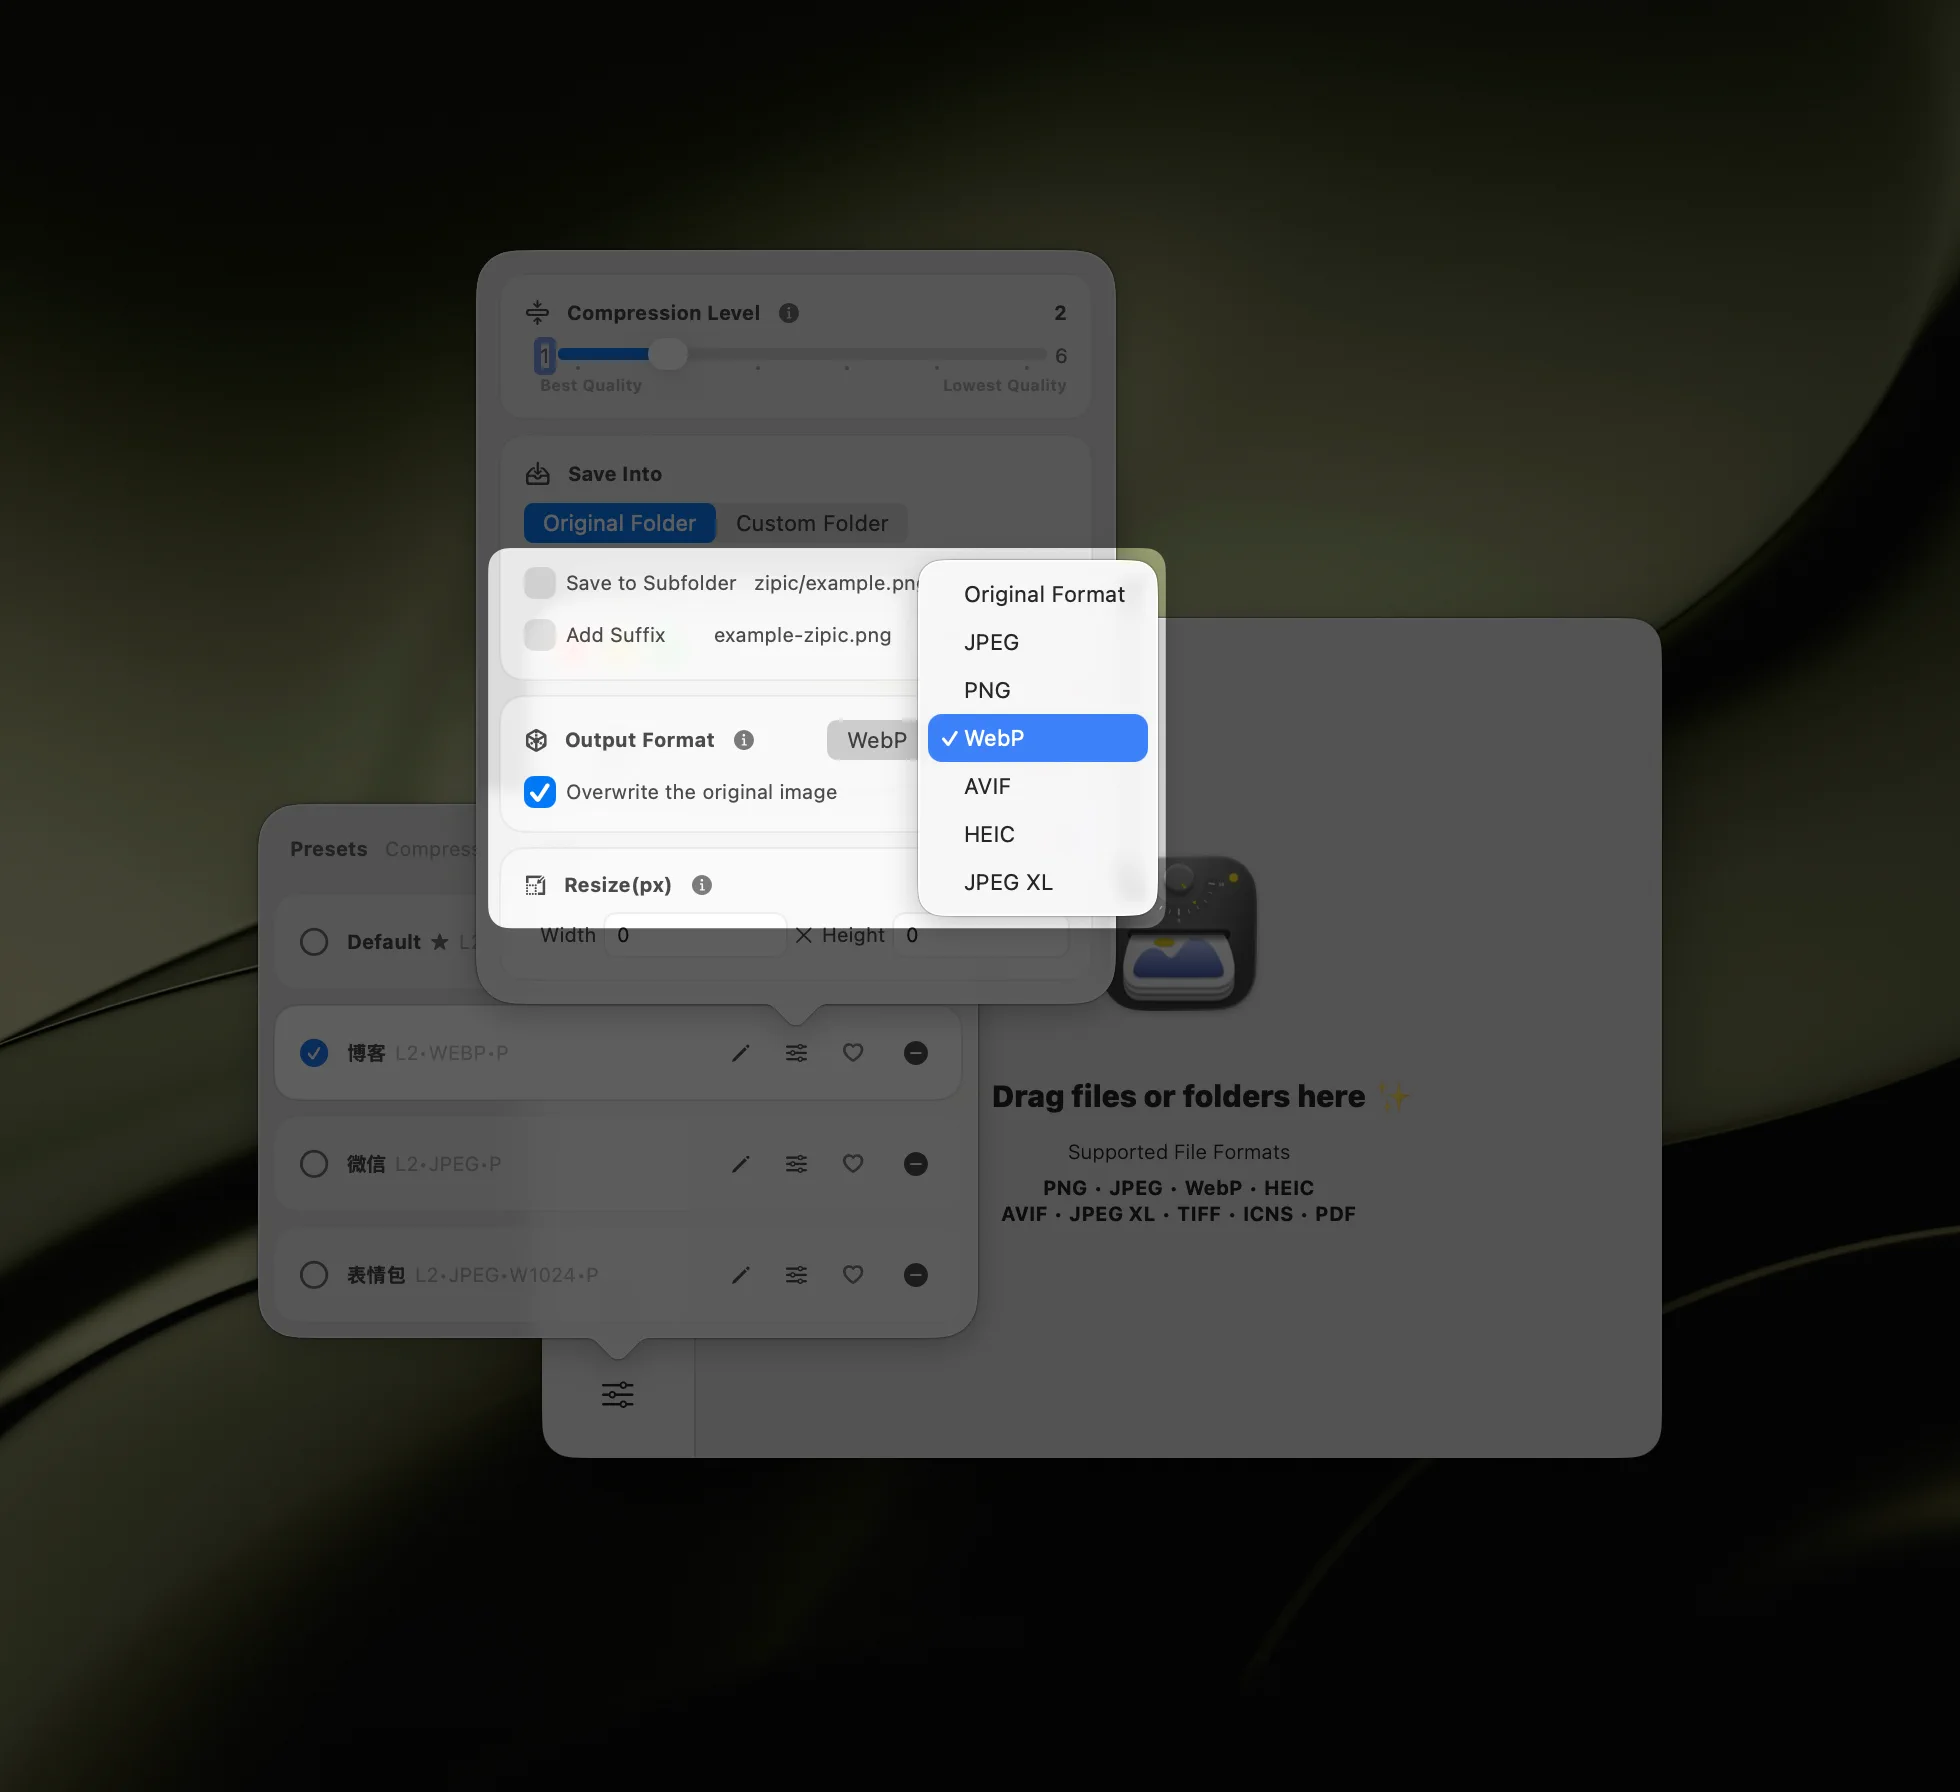
- Compression Level → Level 2 for important deliveries, Level 3 for web and social
- Save Format → JPEG for compatibility, WebP for web portfolios, HEIC for Apple-native storage
- Save To → a dedicated output folder so you never overwrite originals
- Resize → optional, but highly recommended for web delivery
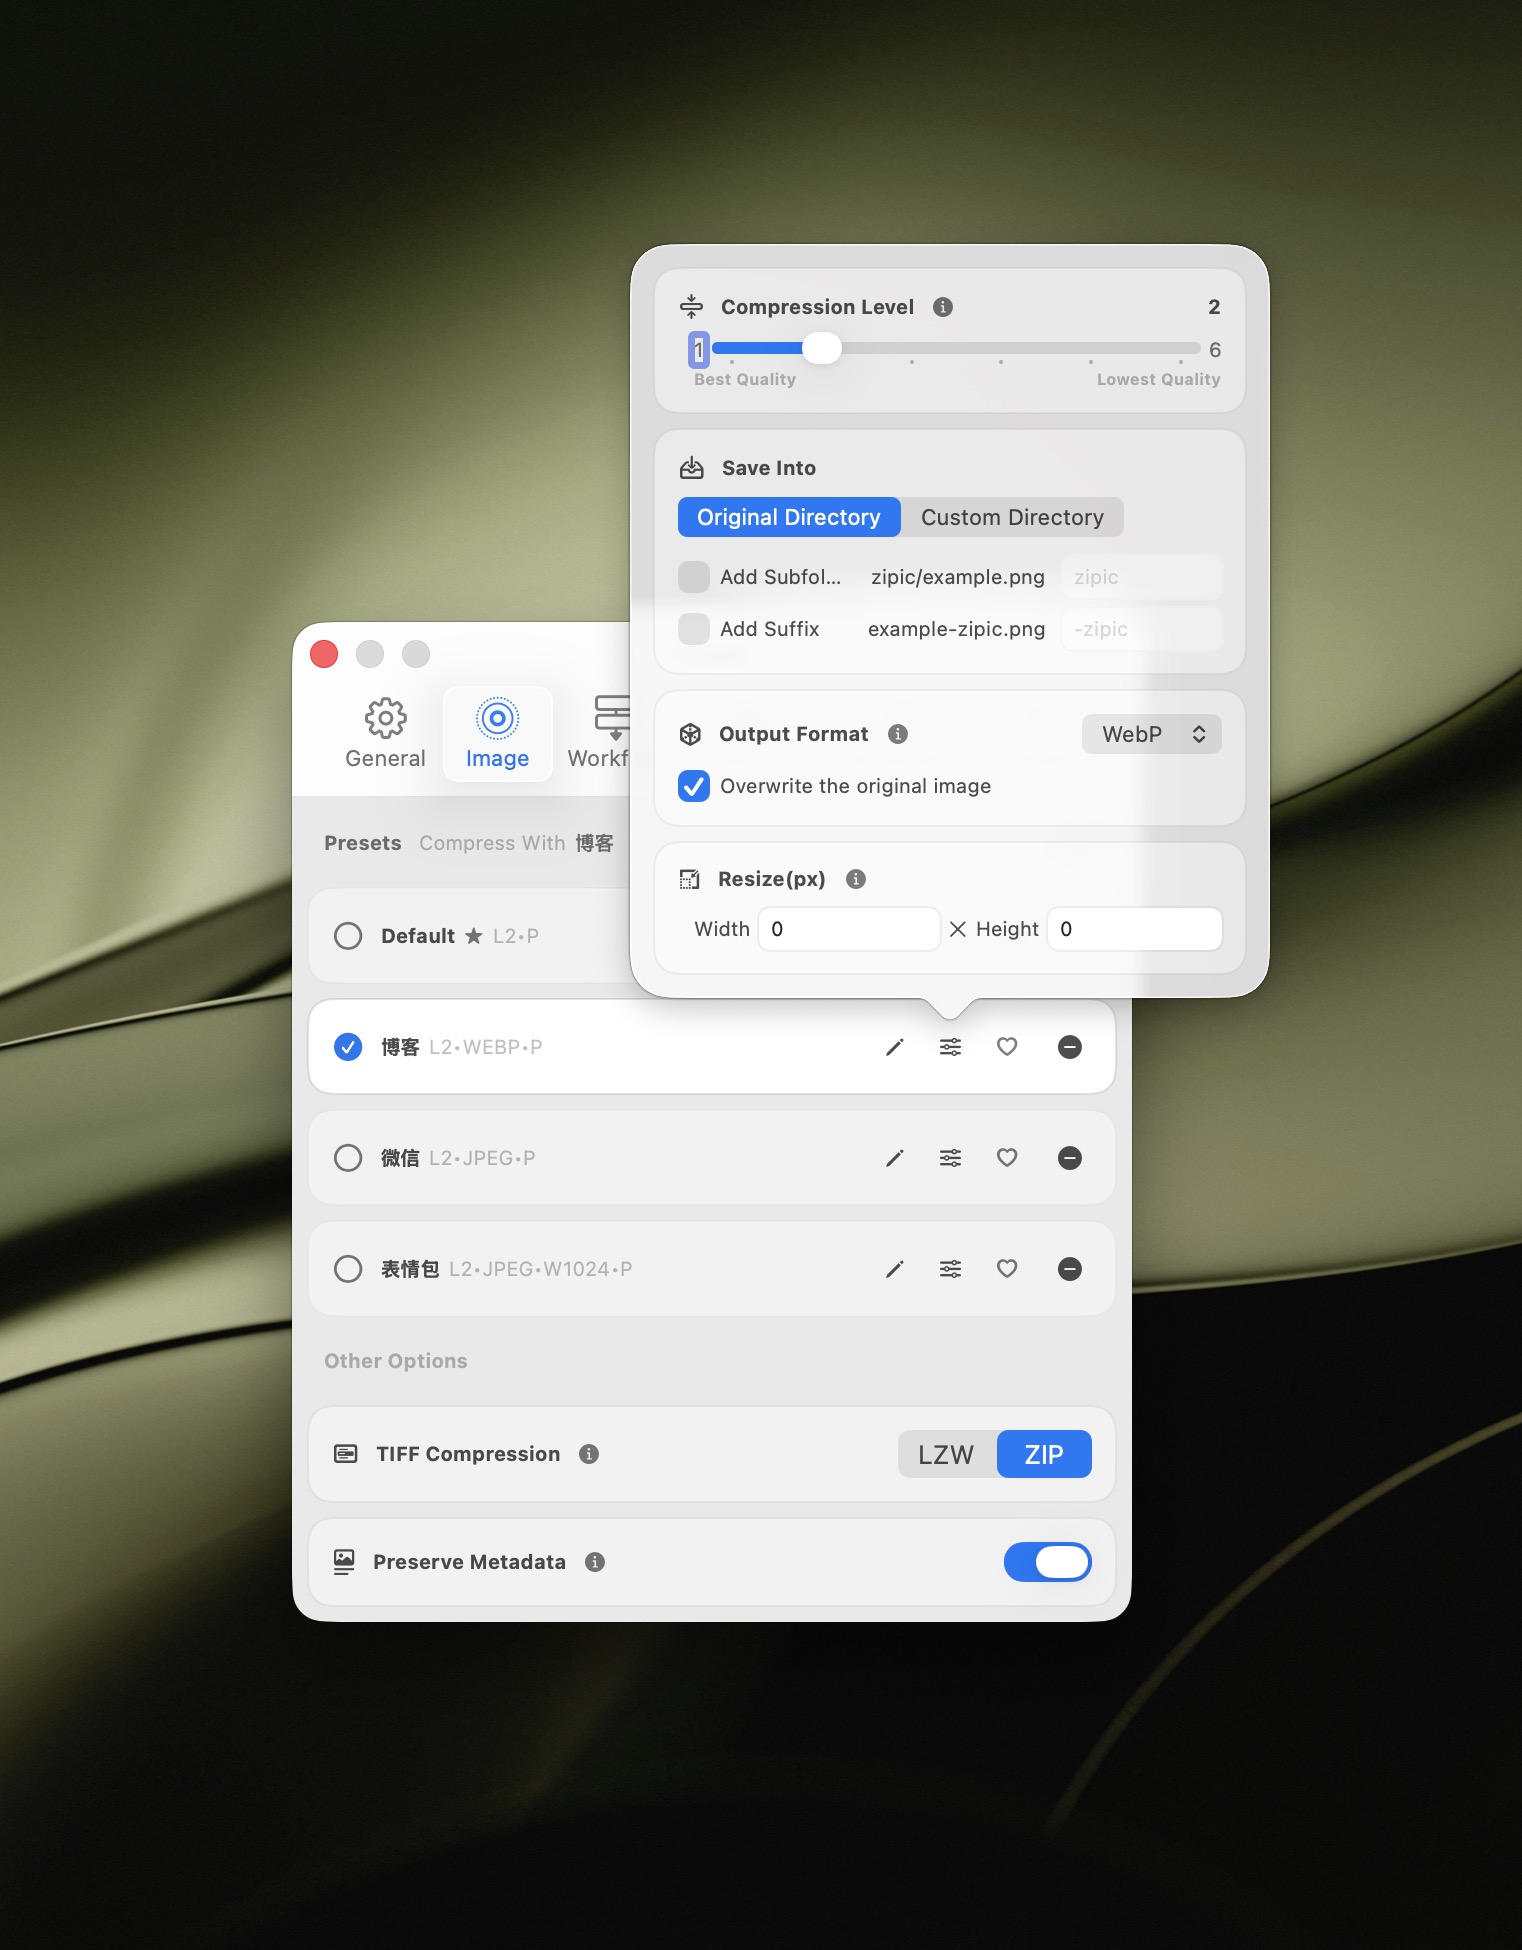
Level 2 is the default answer for anything client-facing. It is visually transparent on almost every photograph and still cuts file sizes dramatically. Level 3 works for blog heroes and Instagram posts where bandwidth matters more than the last 3% of fidelity.
Step 3: Drop Photos In
Drag a folder of exports from Lightroom, Capture One, or Finder directly into the Zipic main window. That is the trigger. Zipic picks up the current preset, processes everything in parallel, and shows results as they finish.
No batch dialog. No “apply to all?” modal. If something looks off, edit the preset and drop the originals again.
Resize and Compress in One Pass
This is the feature photographers under-use the most. Zipic can resize and compress in the same step, which kills the “export twice” workflow completely.
Good target widths by purpose:
- 2560 px — 4K portfolio sites, retina display
- 2048 px — standard portfolio and client gallery delivery
- 1600 px — blog articles, case studies
- 1200 px — email, quick client previews
- 1080 px — Instagram grid, Stories-ready crops
Set Width to your target and leave Height on Auto. Zipic preserves aspect ratio automatically and will not upscale if the source is already smaller. The detailed behavior is documented in the official Resizing Images guide.
Combine resize with Level 2 compression and a 24 MP RAW export usually lands between 200 and 500 KB at 2048 px wide — plenty sharp, plenty small.
Export Presets for Different Workflows
The real power move is having multiple presets, each tuned for a specific delivery channel. Zipic Pro lets you create as many as you need, and you can switch between them by holding the ⌥ (Option) key while dropping files.
Presets worth setting up:
Client Gallery
- Format: JPEG
- Level: 2
- Resize: 2048 px wide
- Save to:
~/Deliveries/[project]/gallery
Web Portfolio
- Format: WebP
- Level: 2
- Resize: 2560 px wide
- Save to: portfolio upload folder
- Format: JPEG
- Level: 3
- Resize: 1080 px wide
- Save to: dedicated IG folder
Blog / Case Study
- Format: WebP (with JPEG fallback)
- Level: 3
- Resize: 1600 px wide
- Save to: blog assets folder
The point is not the exact numbers — it is that every channel gets a preset that nails its own sweet spot. Once configured, delivering for any channel is just “pick the preset, drop the folder.”
For a deeper look at JPEG-specific optimization, read How to Reduce JPEG File Size Without Losing Quality. For format decisions, see How to Choose the Right Image Format for Your Project.
Keeping Originals Safe (Non-Destructive Tips)
A few rules that will save you from ever losing a master file:
Never compress into the source folder. Always point the preset’s Save To at a dedicated output directory. Overwriting originals looks fine until the day you need to re-export at a different size.
Keep a clean master tree. RAW files in one place, full-quality exports in another, compressed deliverables in a third. Zipic works on copies by default — lean into that.
Version by folder, not by filename. Instead of photo-final-v2-web.jpg, use web-1600/photo.jpg and gallery-2048/photo.jpg. Zipic’s folder-based output makes this natural.
Re-export from the master, not from compressed copies. JPEG-to-JPEG recompression is how quality silently dies. If a client asks for a different size, go back to the source.
For higher-volume batch work, Batch Compress Images on Mac: Complete Tutorial walks through repeatable folder workflows in more detail. And for general Mac-wide compression strategy, How to Compress Images on Mac — The Complete Guide covers the big picture.
Related Articles
- Lossy vs Lossless Compression: Which One Should You Use?
- Batch Remove EXIF on Mac: Strip Metadata Before Publishing
- How to Reduce JPEG File Size Without Losing Quality
- Batch Compress Images on Mac: Complete Tutorial
- How to Choose the Right Image Format for Your Project
- How to Compress Images on Mac — The Complete Guide
Learn more: Basic Image Compression · Resizing Images
Ready to stop shipping 8 MB JPEGs to clients? Download Zipic and build a photography workflow that compresses without compromising detail. Every download includes a full 7-day Pro trial. Zipic Pro unlocks unlimited presets, Drag to Notch, and more advanced automation.
Related Reading
How to Compress PNG Files on Mac With Visually Lossless Results
Learn how to compress PNG files and reduce PNG size on Mac with Zipic. Covers lossy quantization with visually lossless results, batch processing, and when to convert PNG to WebP or AVIF.
Batch Compress Images on Mac: 5 Fast Methods That Scale
Batch compress images on Mac with folders, Finder, Raycast, monitoring, or Shortcuts. Compare setup, automation, Pro needs, and safe output options.
How to Compress Images on Mac: 5 Methods That Work
Learn how to compress images on Mac with drag-and-drop, Finder, presets, format conversion, and batch automation while protecting originals and quality.
Compress a PDF Without Losing Quality: Diagnose It First
Learn how to compress a PDF without losing quality by diagnosing oversized images, export settings, and layout problems before choosing a compression level.